Bültene Abone Ol
Aşağıya e-posta adresinizi girin ve bültenimize abone olun
Aşağıya e-posta adresinizi girin ve bültenimize abone olun
Ücretsiz Araçlar


Yapay Zeka Moda Modelleri
Yapay zeka modellerinde vitrin kıyafetleri

Temizlik Resimleri
İstenmeyen nesneleri kaldırın

Arka Plan Değiştirici
Yapay zeka tarafından oluşturulan anlık arka planlar

Yüz Değiştirme
Herhangi bir yüzü anında değiştirin

Giysi Yeniden Renklendirme
Rengi 1 tıklamayla değiştirin

Resim Yeniden Telif Hakkı
reimagine telifsiz fotoğraflarını edinin

Arka Plan Temizleyici
Şeffaf veya herhangi bir renk arka plan

Fotoğraf Geliştirici
Görüntü kalitesini iyileştirin
Uygulamayı İndir

Imagine a scenario – you have clicked an amazing photo, but there are some unwanted objects that are degrading its visual appeal. Well, now with the help of Photoshop or powerful AI tools, you can easily remove any object from your pictures. From cleaning product shots to making landscape photos more appealing, there are so many outcomes you can achieve by doing so! Here, I will let you know how to remove object from photo in Photoshop using its clone stamp tool and its best AI-powered alternative.
If you are into visual editing, then you would already know the diverse use of Photoshop. There are dedicated tools and features in the tool that we can use to make our photos more appealing.
One such tool is the clone stamp, which duplicates pixels from one part of an image and applies them seamlessly to another. It is represented by a rubber stamp icon in Photoshop’s toolbar and operates on the concept of cloning and stamping pixels onto desired areas.
However, the primary use of the clone stamp tool is removing unwanted objects or distractions from photographs, such as dust spots, power lines, people, etc.
How does the clone stamp work?
The clone stamp tool achieves flawless results by blending pixels from surrounding areas, ensuring that the edited portions merge seamlessly into the rest of the image. Using the clone stamp, you can retain the authenticity and integrity of the original photograph while removing any unwanted object.
Now that you know the basics of the clone stamp tool, let’s learn how to use it to remove object from photo in Photoshop. Here’s a step-by-step guide that can help you use Photoshop’s clone stamp tool like a pro:
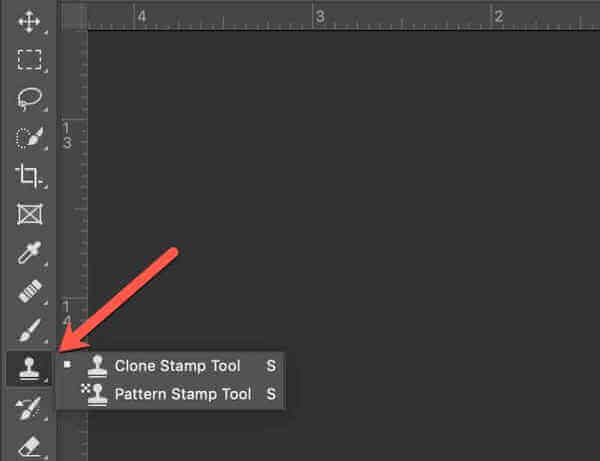
Step 1: Load the photo on Photoshop and select clone stamp
You can start by launching Adobe Photoshop on your system and then load the photo you want to edit. Now, select the clone stamp tool from the toolbar (it looks like a rubber stamp icon as shown above).
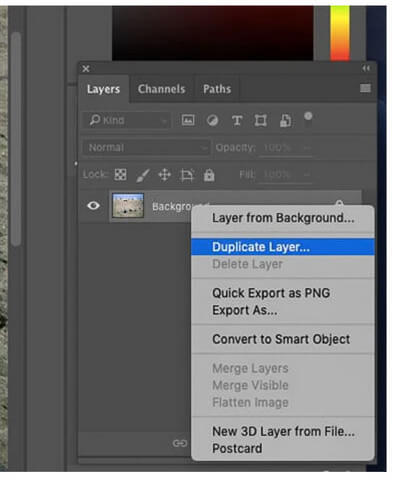
An expert trip would be duplicating the background layer (original image) before you work. In this way, you can easily revert any changes without affecting the original image. To do this, just right-click on the background layer and select the duplicate layer feature.
Step 2: Choose a sample point (source)
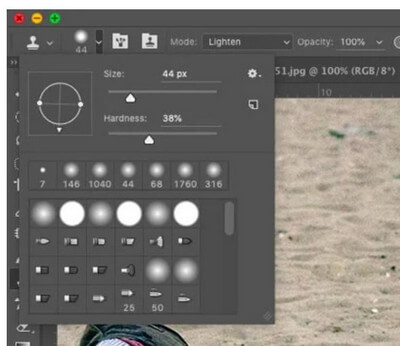
Before you start cloning, you need to tell Photoshop where you want to clone from. For this, you have to pick a soft brush from the toolbar. Here, I recommend selecting the size of the clone stamp thoughtfully with respect to the size of the object you want to remove. If you are new to Photoshop, then picking a medium-sized brush would be best.
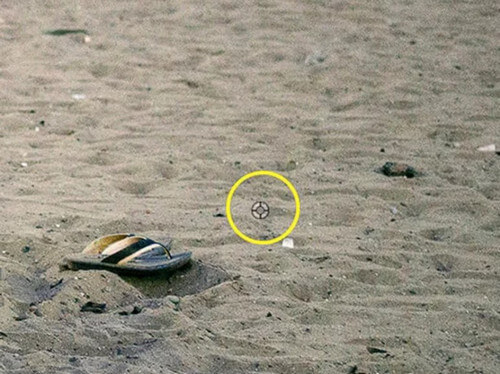
Afterward, you can just hold down the Alt key on Windows or the Option key on Mac. Now, click on a clean, unaffected area of the image that you want to use as your sample point. This will be your reference point for cloning. In most cases, it is the area that is just adjacent to the object you want to remove, but there can be some exceptions too.
Step 3: Paint over the object you want to get rid of
With your sample point set and brush adjusted, it’s time to start cloning. Simply click and drag your mouse over the unwanted object and gradually blend it into the background. Keep an eye on your sample point and adjust it as needed to maintain a natural look.
As you clone, pay attention to how the pixels blend with the surrounding area. You may need to adjust your brush settings or sample point to ensure a seamless blend.
Step 4: Repeat and do a final touch-up
Depending on the complexity of the object you’re removing, you may need to make multiple passes with the clone stamp tool. If you have made a mistake, then you can go a few steps back by clicking on the “undo” button or pressing Ctrl + Z in Windows (Cmd + Z in Mac)
While cloning, try to avoid making patterns and make it look as natural as possible. Once you’ve removed the unwanted object, zoom out and assess the overall look of your image. You may need to do some additional touch-ups or adjustments to ensure everything looks natural before saving your image.
As you can see, with the help of the clone stamp tool, you can easily remove object from photo in Photoshop. However, if you want to master its editing use and get even better results, then consider following these tips:
Master the art of sampling
The key to perfect cloning lies in choosing the right sample point. Experiment with different sample points to find the best match for the area you’re cloning. Remember, the closer the sample point is to the target area, the better the blend will be.
Try to keep it real
While it’s tempting to go overboard with cloning and remove every little imperfection, it’s important to maintain a sense of realism. Avoid repetitive patterns and overly uniform textures, as they can give away the fact that you’ve edited the image.
Take it slow
Take your time with each clone stroke, paying close attention to how the pixels blend with the surrounding area. Don’t rush it – a little patience goes a long way in achieving professional-looking results.
Zoom in and out
Don’t forget to zoom in and out of your image as you work. Zooming in allows you to focus on fine details and make precise adjustments while zooming out gives you a better perspective on the overall look of your image.
Use layers and masks
To give yourself more flexibility and control over your edits, consider working on separate layers with layer masks. This allows you to make non-destructive edits and easily tweak your cloning without affecting the original image.
Try blend modes
The clone stamp tool works perfectly with Photoshop’s blend modes, giving you even more creative freedom. You can experiment with different blend modes to achieve all kinds of effects and textures in your photos.
The process to remove object from photo in Photoshop is quite tedious and time-consuming. These days, both beginners and professionals take the assistance of AI tools to meet their editing needs. One of the most effective AI visual editing tools is iFoto Temizleme that can help you clean your photos in seconds.
Even if you don’t have any prior editing experience, you can instantly remove unwanted objects from photos with iFoto Cleanup. You can access iFoto Cleanup by visiting its website on any browser or via its iOS/Android app. Once you have logged in to your iFoto account, you can follow these steps to remove any unwanted object from your photos:
Step 1: Load your photo on iFoto Cleanup
Once you go to the iFoto Cleanup’s home, you can simply drag and drop your photo to its interface. You can also choose to browse your photo from your local storage and load it on iFoto’s interface.

2. Adım: Kaldırılacak nesneyi seçin
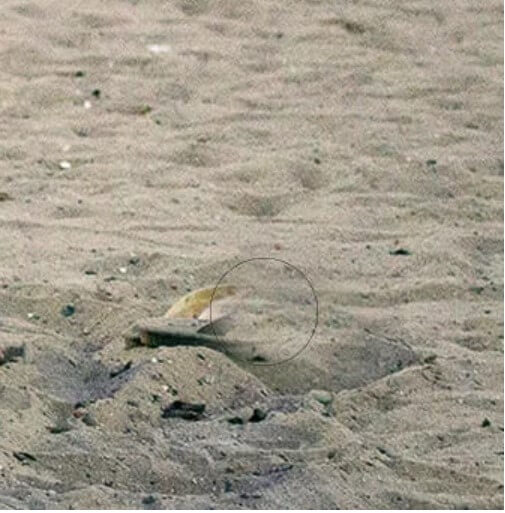
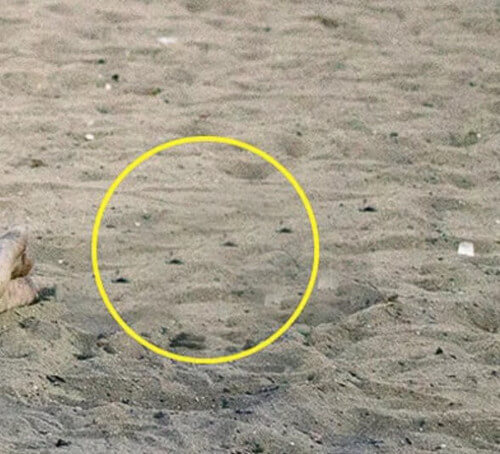
After the photo is loaded, you can use its brush to simply mark the area/object on the image you want to remove. As you hover over the area, it will be highlighted, and you can precisely make your selection.

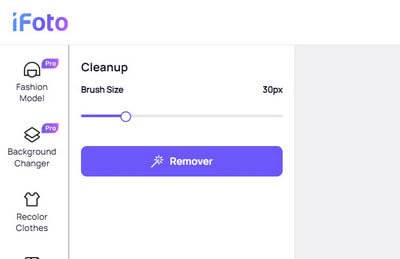
To fine-tune the selection, you can also go to the side panel and change the size of the brush. Once you are done selecting, just click on the “Remover” button.
Now, iFoto will do its magic and automatically remove the highlighted object from your image. Its AI algorithm will produce a flawless finish, blending the area with the background so that no one can judge that the image has been edited.

Step 3: Preview results and save your image
That’s it! You can now just check the end results and even fine-tune them by making any other selection and repeating the process. In the end, you can just download the edited image to your local storage and use it however you like!

This brings us to the end of our guide on how to remove object from photo in Photoshop. As you can see, I have come up with a step-by-step solution for using the clone stamp tool in Photoshop that can help you remove any unwanted object from your image. Since Photoshop is not that user-friendly and can take a lot of time to master, you can consider using iFoto Cleanup instead. The AI-powered tool is extremely reliable and provides instant results for removing any unwanted object from your photos. You can use iFoto for free and leverage its AI algorithms to meet your visual editing needs in one place.