订阅时事通讯
请在下方输入您的电子邮件地址并订阅我们的时事通讯
请在下方输入您的电子邮件地址并订阅我们的时事通讯
One of the most important things in photography is the quality of the images. This is what separates a clear picture from one that looks poor. If you don’t compress photographs well, you often end up with pixelation.
If your photographs have low pixels, they might not be readable or engaging for the view. Because of this, you need to fix it, but you want to maintain quality. Read this article to learn how to fix pixelated images without losing quality.
You will learn about pixelated pictures and the different methods and tools you can use to make them look as clear and sharp as possible. So, whether you’re a professional photographer or a casual hobbyist, this guide will help you get the most out of your photos.
Pixelation is the phenomenon that makes a picture less clear by reducing the number of pixels. There are many reasons why this might happen, including image compression, editing, or mistakes when taking a picture.
Pixelation can make pictures fuzzy or confusing or look only in black and white. It can also give the picture a jagged look. A ragged, pixelated look is often seen in compressed images, which reduces the file size but can cause pixelation.
You might see pattern noise pixelation and banding pixelation. Banding pixelation looks like a single, continuous line, while pattern noise pixelation randomly appears all over the picture. Poor picture editing software, images, and scanning devices can all lead to the first problem.
Images with low resolution don’t have enough pixels per inch to show features smoothly, which leads to pixelation. Seeing pixels in low-resolution photos makes the edges rough and the pictures fuzzy.
This problem usually occurs when you try to make small pictures bigger or use files that don’t have the proper resolution for printing or showing. This causes pixels to show up, and the quality of the image drops.
Pixelation often occurs when a picture is stretched or shrunk without keeping the original aspect ratio. This changes the size of the pixels, blurring the image and making it less clear. Pixelation can also happen when pictures are resized beyond their original size.
This especially happens when you enlarge small images. To prevent this, make sure you use the correct resizing methods or originals with a high resolution when you change the size of a picture.
Another vital cause of photo pixelation is the wrong way of compressing or enlarging pictures. Compression can make a photo file smaller, but too much compression can cause the image to lose pixels.
In the same way, increasing the size of a picture beyond its resolution limit can cause pixels to appear because the software will try to guess and fill in the extra pixel data, which it often does wrong.
Photo corruption is an often overlooked cause. It can happen for several reasons, such as bad device handling, mistakes with storage media, software bugs, or power outages during data transfer.
This corruption can change the digital information in a picture, making pixels or other strange things appear. When photo corruption happens, you might need a good photo repair tool to fix pixelated images.
Poor camera settings during photo-taking can cause pixels. Pixelation can happen when the settings are wrong, like when the quality is too low, the compression is too high, or the focus isn’t good enough. This is especially noticeable in digital photos.
To keep this from occurring, make sure that the camera’s settings, such as the size, compression level, and focus, are set correctly for the shooting conditions so that you get clear, high-quality pictures without pixels.
Fixing pixelation is an essential part of making pictures clearer to see. Pixelation changes an image’s sharpness and features, which makes it look blurry or jagged.
Fixing pixelated images restores their sharpness and smoothness, making them more apparent and better overall. This ensures that viewers can see the essential details correctly, resulting in a better and more professional picture.
Pixelation correction is essential to enhancing the visual impact of photos. A pixelated picture makes images look less professional and appealing to the eye, which could diminish the viewer’s total experience.
Eliminating pixels makes pictures look sharper, clearer, and more pleasing to the eye, which improves viewer engagement and understanding. You can be sure that the message or impression you want gets across clearly, making the viewing experience better and more memorable for the viewers.
Fixing pixelation is essential for making sure that images provide clear information. Pixelation messes up details, which makes it hard for people to understand what they’re seeing.
By fixing pixelation, pictures send messages more clearly, which makes it easier to share information, ideas, or concepts. This improves the visual material overall so viewers can understand and be more interested in it, whether for educational, informative, or promotional reasons.
To get good print clarity, you must fix pixelation. Pixelation is when you can see individual pixels, which makes the picture less clear and sharp. This fixes the pixelation problem so that pictures look smoother and have more details, which improves the print quality overall.
This is especially important for professional printing jobs, as it must be clear and accurate. High-quality printing not only makes something look better but also makes it look more professional and trustworthy.
If you care about your brand’s image, you must fix pixelated images. Pixelated pictures show that you don’t pay attention to details or aren’t professional, which could hurt how people think of your brand.
Clear, high-quality pictures are suitable for a brand’s reputation for quality and dependability. Pixel-free images in marketing materials and online content show professionalism, trustworthiness, and attention to detail, all of which are important for building and maintaining a solid brand reputation.
不用上传,图片url: https://www.ifoto.ai/blog/wp-content/uploads/ai-photo-enhancer-1.web

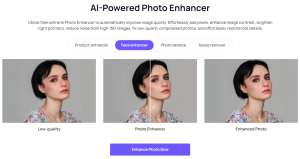
Now that you know why it is important to fix pixelated images, you might be looking for an app that can do it properly. The best tool is the one that fulfills your needs while staying within your budget. iFoto AI, a free AI-based photo-enhancing tool, matches both parameters.
If you’re looking to fix Pixelated Images online for free, iFoto AI can do it for you accurately. The AI algorithms are efficient enough to fix and integrate overwhelming pixels for a clear picture.
As discussed above, iFoto AI stands strong as the best tool for fixing pixelated images online. It’s free, fast, and efficient and can fulfill the image enhancement needs of both personal users and businesses.
Thanks to its powerful AI implementation, iFoto AI can provide precise results in the highest quality possible. From pixelation to blurriness, this AI tool is a perfect choice to enhance images and fix any required issues.
The best part is that depixelating any image only takes three easy steps. You don’t need to fill out any reCAPTCHA or mess up with unnecessary ads. Just upload, enhance, review, and download. That’s it! Let’s show you how it works.
第 1 步:上傳您的圖片
The first step to fixing a pixelated image is to visit the photo enhancer web app. iFoto offers a clean UI and easy-to-use dashboard for your convenience. Click the Enhance Photo Now button to process outdated, fuzzy, low-quality images.

Step 2: Boost the Quality of The Image
After that, it will redirect you to the exclusive dashboard of iFoto AI photo enhancer. Click on the “Upscale” button to instantly remove all the defects from your image and provide a crisp, clear photograph. The resolution is set to 2X for the best results.
Step3: Download high-definition Picture
Once you’ve enhanced your image, give it a final look and check for technical defects. You can immediately download your newly improved picture to share or further edit on your desired device.
You should usually set your resolution to 300 ppi (pixels per inch) when you want to print a picture. On the other hand, 72 ppi is fine for watching on a flat screen. This is the standard quality for pictures you get from the web. The quality is probably too low if you’re having trouble with pixels. Let’s start by making it more robust. Select Image Size from the menu bar.
This picture has a quality of 96 ppi. We should change the size to 300 ppi. Check the box that says “resample.” To increase the resolution with as little loss of quality as possible, Photoshop will automatically try to fill in the pixels with the right color. Press OK. There should be fewer pixels now, but let’s see what else we can do.
Let’s make these changes non-destructive first before we start adding filters. To make a copy of the picture, press Ctrl + J or Command + J. Click the copy layer and pick “Convert to Smart Object” from the menu. This makes it possible to change the filters we’re about to add, so you can return and make changes.
In the menu bar, go to Filter, move your mouse over Noise, and select Despeckle. You can do this more than once if you want to. Press Alt + Ctrl + F or Option + Command + F to use the same filter again. This will make the edges a bit less rough.
You can add a Gaussian Blur effect to break up the edges further. Click on Filter, then Blur, and pick Gaussian Blur.
Pick the Radius amount that appears in the box. When you use this method, a few pixels go a long way, and more pixels mean more noise. The average value is 0.3 inches. Pick something that looks good on your picture and press OK.
After the first two filters, we made things less clear. Let’s bring out the lines with a sharpness filter. To get to Unsharp Mask, go to Filter and move your mouse over Sharpen.
Do not change these numbers too much, or the picture will look too sharp. This is very true for images of people. Sharpening skin too much makes lines and other flaws stand out and doesn’t look good. In this picture, we can push it a bit to make the feathers stand out.
Check the image to ensure it’s your desired quality, then download the final copy. Save the picture in the format you wish to use or share it with others. Ensure there aren’t too many pixels and the image looks clear and sharp.
Set your camera to high quality to avoid pixelation in your pictures. Images that are sharper and clearer are the result of higher-resolution settings that pick up more information. This makes it possible for files to be bigger to hold more fine features without losing quality.
It’s essential to choose the correct resolution for what you are doing. Higher resolutions may take up more space, but they produce better images, especially for prints or enlargements.
If you want to avoid pixelation, avoid using digital zoom when taking pictures. Instead, use optical zoom. Using digital zoom to make an image bigger can cause it to lose detail and become pixelated.
On the other hand, optical zoom physically changes the lens, so the quality and clarity of the picture stay the same. Using optical zoom instead of digital zoom lets you get sharper and clearer photos without the risk of pixel or quality loss.
When taking pictures, choose the right file format, usually RAW, to avoid pixelation. Compared to compressed formats like JPEG and JPG, RAW files store more picture data.
When you choose RAW, you maintain the best picture quality and have more editing and post-processing options. Avoiding JPEG and JPG formats lowers the chance of compression errors and preserves your images’ clarity and detail, which helps prevent your final photos from having pixels.
Using the right lenses is essential to avoid pixelation when taking pictures. Sharpness, distortion, and chromatic aberration are some of the things that make each lens different and affect the quality of the picture. If you choose the right lens for your subject and the conditions of the shot, you can get sharp, clear images with few pixels.
Wide-angle lenses are great for taking pictures of scenery, while telephoto lenses are better for taking pictures of things that are far away. Knowing your lenses and what they can do will help you get the best picture quality and avoid pixelation.
To keep your pictures from getting pixelated, use a stand or press your camera against a solid surface to keep it from shaking. When there isn’t much light or a slow shutter speed, the camera can blur pictures and cause pixelation.
Using the image stabilization features on your camera or lens can also help make up for small moves and ensure that your photos are sharper, clearer, and less likely to get pixels.
In conclusion, fixing pixelated images is crucial for enhancing your pictures’ quality, impact, and clarity. By understanding the reasons behind pixelation and using the right depixelation tools and methods, you can restore your photos to their full potential without losing quality.
Whether you’re a professional photographer or an amateur, fixing pixelated images can make a significant difference in your overall photography experience. So, take the tips and techniques outlined in this article to create clear, sharp, and engaging images.